
This article is about pre-mastering. That means exporting a stereo audio file that you will use for mastering, later, in another audio project. Not in your multi-track project.
Never try to do mastering in the same multi-track session where you produce your music.
Doing that is like trying to cut your own hair.... you think you did a good job, but you totally didn’t!
Now, these are some guidelines to help you along the way to making the best possible tracks you can.
It’s not going to teach you how to be a mastering engineer. That takes time.
In a hurry? Get the checklist here and read it later.
Before we start: if you just want to drop Ozone on your session and export that way, fine. You won’t learn much audio engineering and this article is not for you. Go make music, your creative force field is more important than technical operations at this point.
WHAT IS A PRE-MASTER?
What does it mean to make a “pre-master” and why should I bother?
A pre-master is just a stereo audio file with lots of headroom and no master channel effects. It’s the raw material that a mastering engineer will turn into a finished track that sounds louder, wider, deeper, and more 3-dimensional than your mixdown.
After that it can be put on vinyl record, a cassette tape for duplication, a digital file to burn on CD, an MP3 for digital distribution, etc. There are different technical details of mastering for those formats, but we’re not going to get into that.
Making a premaster is basically called “don’t mess up your recordings!” In other words, you need to give the mastering engineer something they can work with, that’s not already squashed and smashed and messed-up from amateur compressor experiments.
HOW THIS WILL HELP YOU
There are some important ways it helps you, as a producer, to make pre-masters.
First, it will push you to make better mixes. That means deciding your mix is done BEFORE you start mastering, and forcing yourself to commit to mix decisions… not saying “I’ll fix it later.” Don’t simultaneously mix your channels while adjusting a Compressor + EQ on the master track. I know people talk about mixing into a compressor. When you know what you’re doing, that’s cool. But if you haven’t learned to control your rough mix yet, that won’t help you understand what you’re hearing.
Second, making pre-mastering will make the mastering process easier. This is because you’re not trying to surgically repair things that should have been fixed in the mixdown! Mix first, fix what needs to be fixed, and then focus on mastering in a totally new session.
You’ll appreciate the value of this when, one day, you need to master a group of tracks together. They should in the end sound like one group of tracks, not like strangers who came from all different sonic universes. You can’t compare multiple songs to each other, and to reference mixes, when you’re trying to do mastering inside your multi-track production session.
That would be like trying to get a haircut while riding your bike, or something. I don’t know. You get the idea so let’s get to the practical part.
Here's how to prepare your music for mastering.

Download this checklist from the link below, print it out, hang it on the back of your bathroom door, and memorize it until you can do it in your sleep.
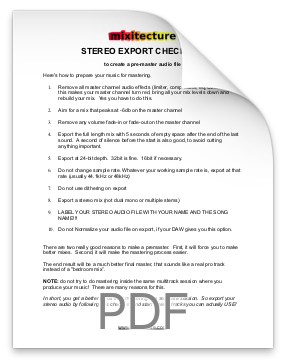
STEREO EXPORT CHECKLIST
Remove all master channel audio effects (limiter, compressor, eq, etc). If this makes your master channel turn red, bring all your mix levels down and start over. Yes, you really have to do this.
Aim for a mix that peaks at -6db on the master channel
Remove any volume fade-in or fade-out on the master channel
Export the full length mix with 5 seconds of empty space after the end of the last sound. A second of silence before the start is also good, to avoid cutting anything important.
Export at 24bit depth. 32bit is fine. 16bit if necessary.
Do not change sample rate. Whatever your working sample rate is, export at that rate (usually 44.1kHz or 48kHz)
Do not use dithering on export
Export a stereo mix in .wav or .aif format. (make sure it’s not mono or split to dual mono. Stem mastering is something else. Keep it simple until you learn more.)
Do not Normalize your audio file on export, if your DAW gives you this option. Normalizing is an archaic audio tool. You can ignore it 99.9% of the time.
LABEL YOUR STEREO AUDIO FILE WITH YOUR NAME AND THE SONG NAME!!! I’ll give you a little choice on this. Either label your file correctly, or take yourself to the nearest volcano and dive headfirst into burning lava. There is no other option.

GRAB THIS CHECKLIST
THIS LAST PART IS THE MOST IMPORTANT PART
Export a mix and share it. Even if you feel intimidated to let people hear your work.
You’re invited to get feedback on your tracks from a great group of creative producers who are super-supportive.
Share your test mixes in the mixitecture facebook group. Click the pic to get in:

This is a great place to get feedback on your tracks, collect comments and find some encouragement for the process we’re all going through (I crush trolls.)
Post a link we can listen to (not a download), and also add your ideas to other people’s music. Dropbox, Soundcloud, whatever.
Let’s make some tracks.
-steve knots
